Drop Down MenusCSS Drop Down MenuPure CSS Dropdown Menu

Monday, May 13, 2019

Getting Started Natural Language Understanding with LUIS


Introduction:
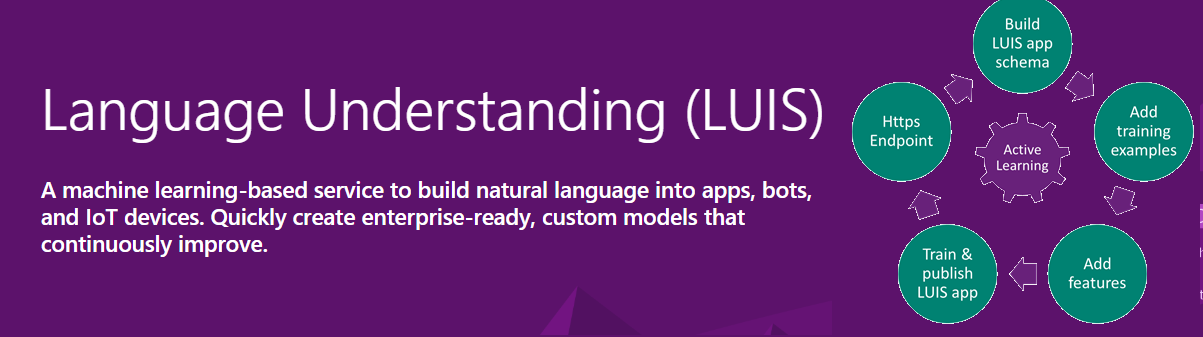
Language Understanding service (LUIS) allows our any application to understand what a person wants in their own words. LUIS can integrate to Windows, Web, Bot and mobile application, which can consume Json response to the application. LUIS uses machine learning to allow developers to build applications that can receive user input in natural language and extract meaning from the user input.
Building an app is a free and doesn't require an Azure subscription, in this article, I will show how to build a new app in the LUIS portal.
Once the LUIS app is published, a client application sends utterances (text) to the LUIS natural language processing endpoint API and receives the results as JSON responses. First you create the basic parts of an app, intents, and entities. Then you test the app by providing a sample user utterance in the interactive test panel to get the predicted intent.
Create LUIS App:
Step 1: Navigate to LUIS Portal in a browser and sign in. if you are trying to create first time signing in, you need to create free LUIS account.
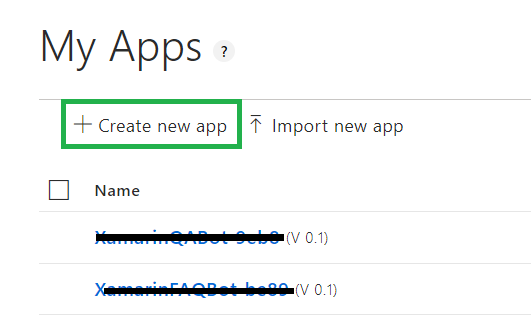
Step 2: Click on “Create New App” from portal menu options.

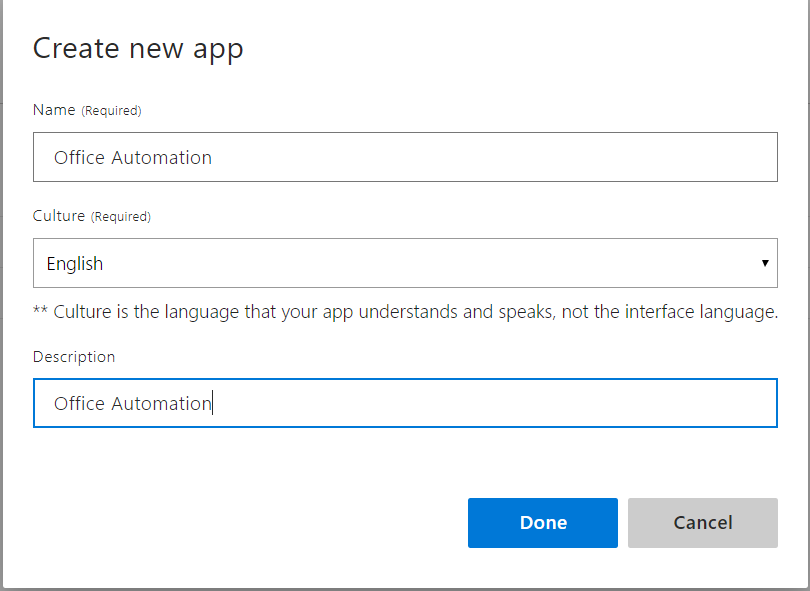
Step 3: Provide name, culture and description in the following information into the new app screen.
  • Name - provide the relevant to your application and Unique LUIS app name
  • Culture – Luis will support multiple language, now we will select as English Language
  • Description - Provide the Description of app and its optional field
Once completed, Click on Done button and Select “Build” menu from main menu.
Create Intents:
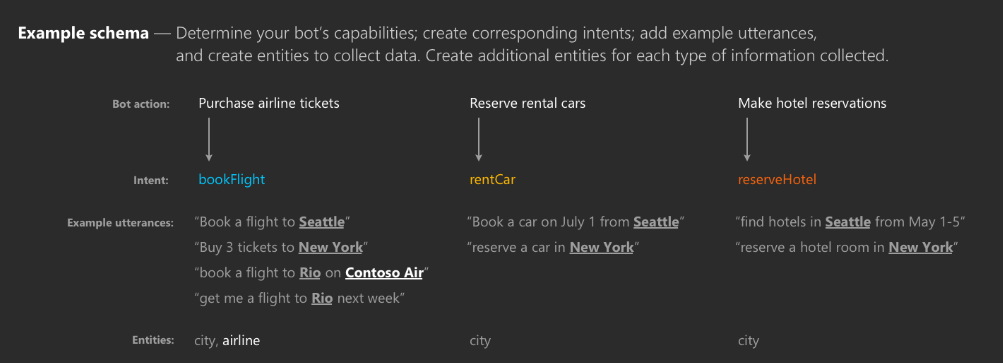
Intent is an action the user wants to perform. Natural language is extremely flexible. in fact, different languages and cultures make them less or more flexible. But what is the user’s "intention?" It’s the goal the user is trying to achieve. Maybe they want to turn the lights on. Maybe they want to schedule a calendar appointment. Maybe they want to Send Email. Whatever the intent may be, the user can express themselves in a multitude of ways, but it always translates to one intent. LUIS understands utterances and converts them to one or more intents that you specify in our LUIS application. There are two type intent
  1. New Intent – you can create custom intent-based user needs
  2. Add prebuild domain Intent - you can use prebuilt intents from one of the prebuilt domains.
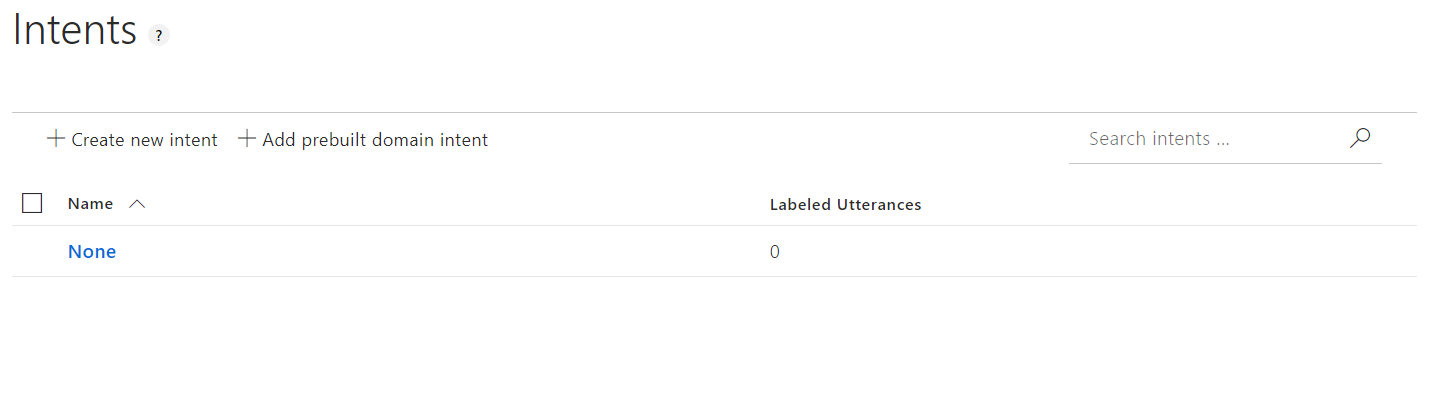
Select Intents > Click on New intent or Add prebuilt domain intent
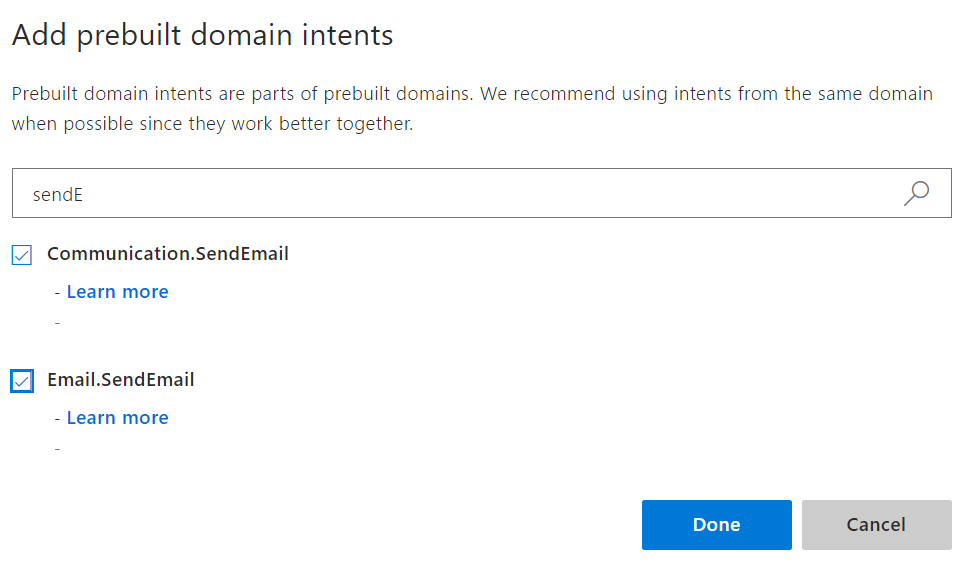
Prebuilt domain intents are parts of prebuilt domains, you can select inbuild category and intents from the list, here, we will select sending email and send email prebuilt domain intents
Create Entities:
When the user issues a command as an utterance, that utterance is converted into an intent. But hidden inside that utterance is important data that’s needed to complete the action. For example, "turn the lights off" represents an action called "off;" what entity is it working on? It’s working on lights. You need to extract a single entity out of this utterance.
Select Entities > Add the Prebuild domain entity

LUIS comes with a number of prebuilt domain models with prebuilt entities. Or you can quite easily create a new custom domain model with custom entities. Here we are creating Prebuilt domain entry
In order to train the model, you’ll see a Train button on the top right-hand corner
Now you can start publish our LUIS application
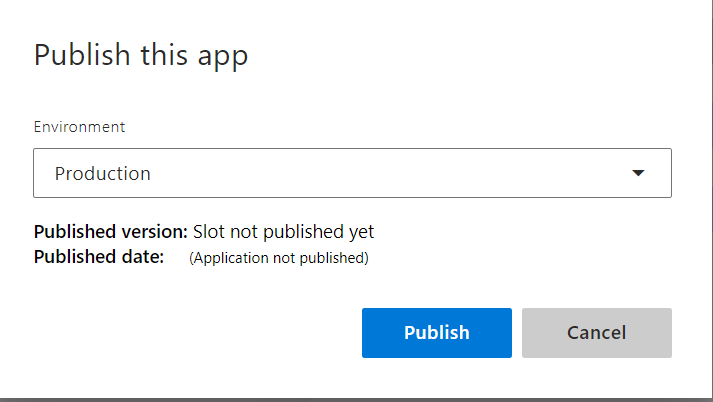
While publish application, will be available multiple environment, let we start “Production” environment and publish
after publish its available in publicly the end point URL
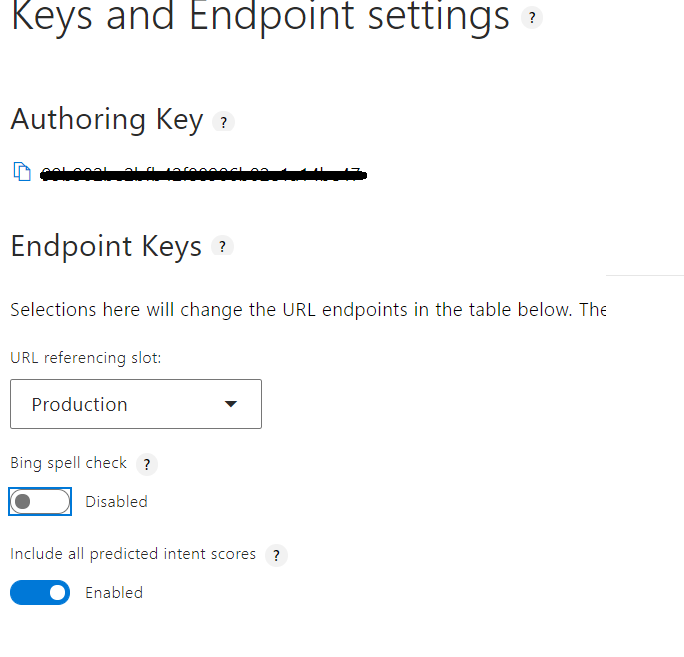
Here you can view your publish settings, as well as your LUIS App ID and Password. You will need these to access your LUIS app from your client applications. Please note that you can also type in queries directly to your production endpoint, and you’ll get a JSON response from LUIS

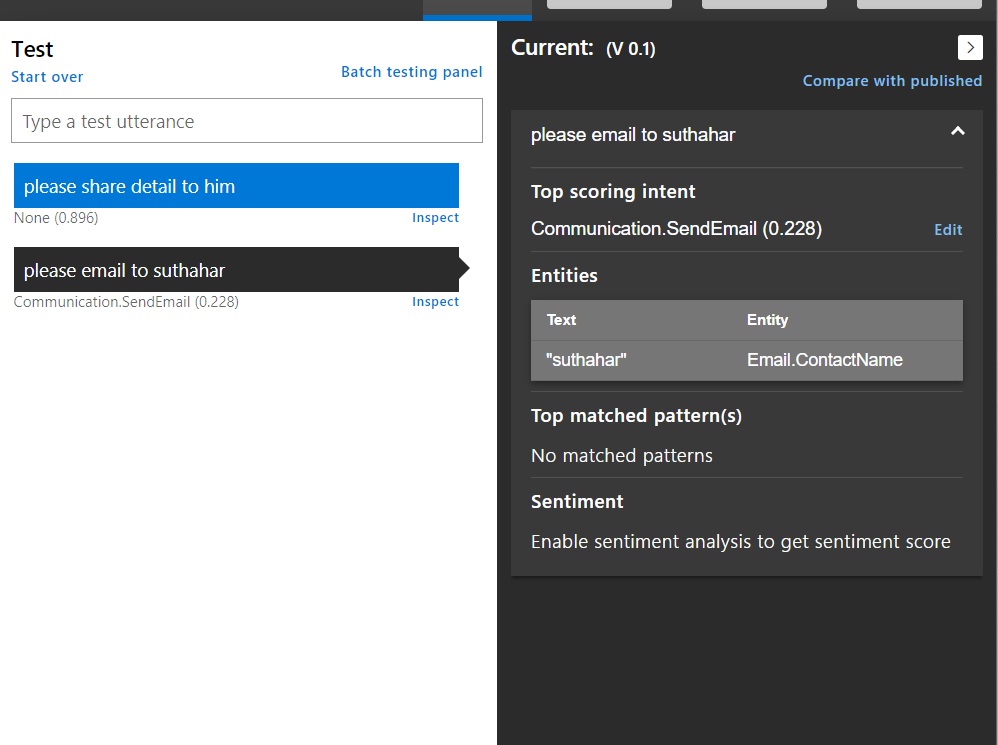
When your model is trained and up-to-date, you can then open the test panel and provide some utterances to your LUIS model
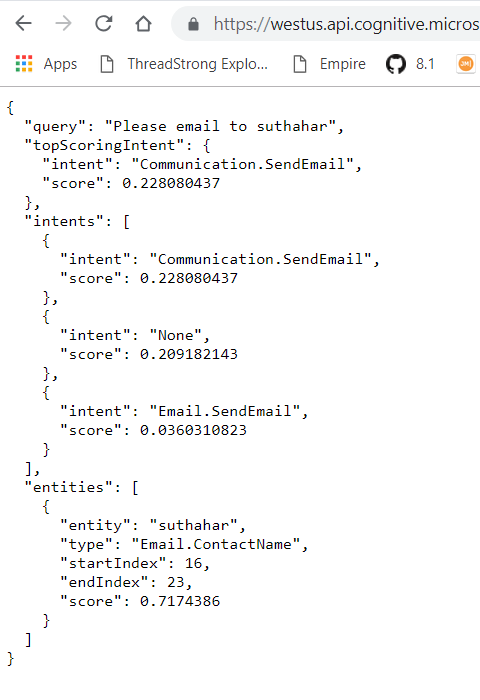
You can copy paste the URL highlighted in key Endpoint setting screen and under the endpoint column (note that the app ID and keys are removed for this image) into an internet browser, and type the query – “Please email to Suthahar”. Below is the full JSON response for the query
Summary
In this article, you learned about how to create Natural Language Understanding app with LUIS .If you have any questions/ feedback/ issues, please write them in the comment box.

Saturday, March 30, 2019

Conversational AI Bot deploy to Line App using Azure Bot

The Bot Application runs inside an application in different channel like Cortana, Skype, web chat, Facebook, Message, etc. Users can interact with bots by sending them messages, commands, and inline requests. Microsoft has announced Line App new channel added into the Azure portal.


LINE is a new communication app which allows you to make FREE voice calls and send FREE messages whenever and wherever you are. Line is available in different device iPhone, Android, Windows Phone, BlackBerry, and Nokia and even your PC and LINE is a popular messaging app with hundreds of millions of users in India, Japan, Taiwan, Thailand, Indonesia, and other countries. You can follow the below steps for Create FAQ Bot and enable your bot in the Line new channel


Create FAQ Bot Application

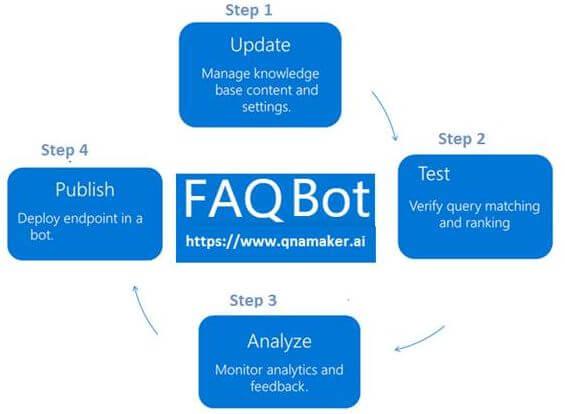
You can refer to my previews article to create and build a Xamarin FAQ Bot using Azure Bot Service and deploy it into Azure. I am not using any coding for developing the Bot Application, you can follow the provided steps in the article to create and deploy FAQ Bot.


Line Developer Portal

We can implement a Bot Application to the Line apps. You can create a Line developer account or select an existing provider name. Create a new Line Developer App on the Page and generate an Channel Secret and Channel access token for integrating the Bot to the Line ap. You can start login or create account in the following screen.


Create Provider:

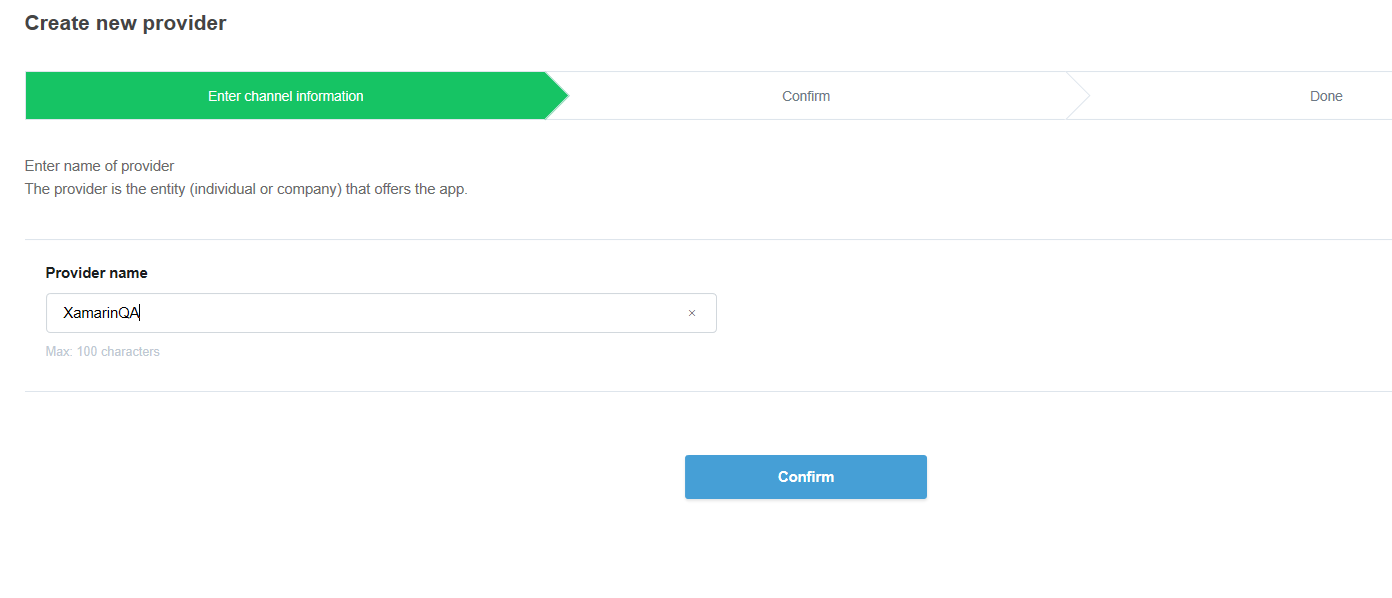
After login, start create a provider name for your bot or if you already have the provider, select the provider name and do the setup. The provider name is individual owner or company, it’s not app name. Next Click on confirm, if you want change in future, edit options always enables.


Line Messaging API channel:

Create a new Line App on the developer portal and generate a Channel Secret and Channel access token integrating the Bot to the page messenger. You can click on “Message API Create Channel” from the following screen.


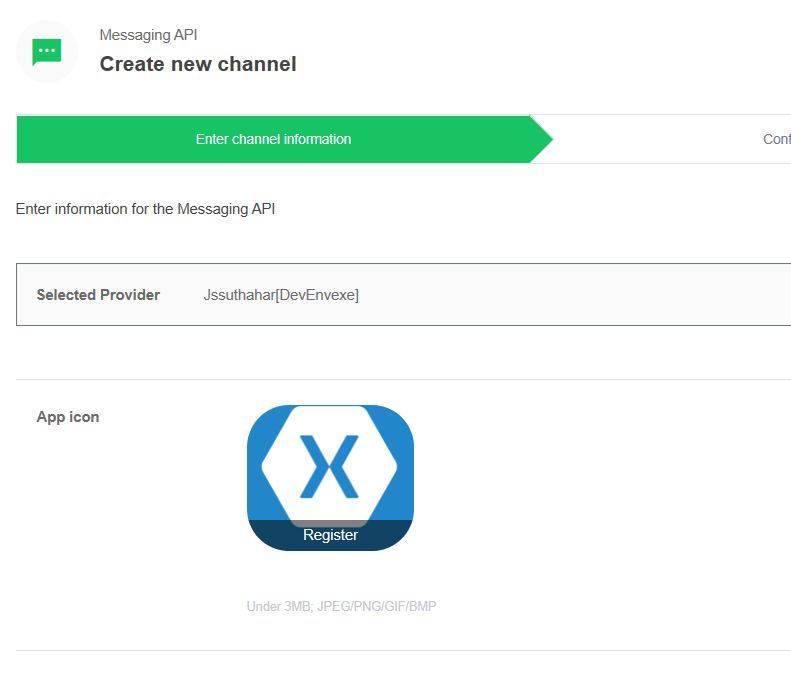
Create New Channel:

The following create new channel screen provide valid your app icon.


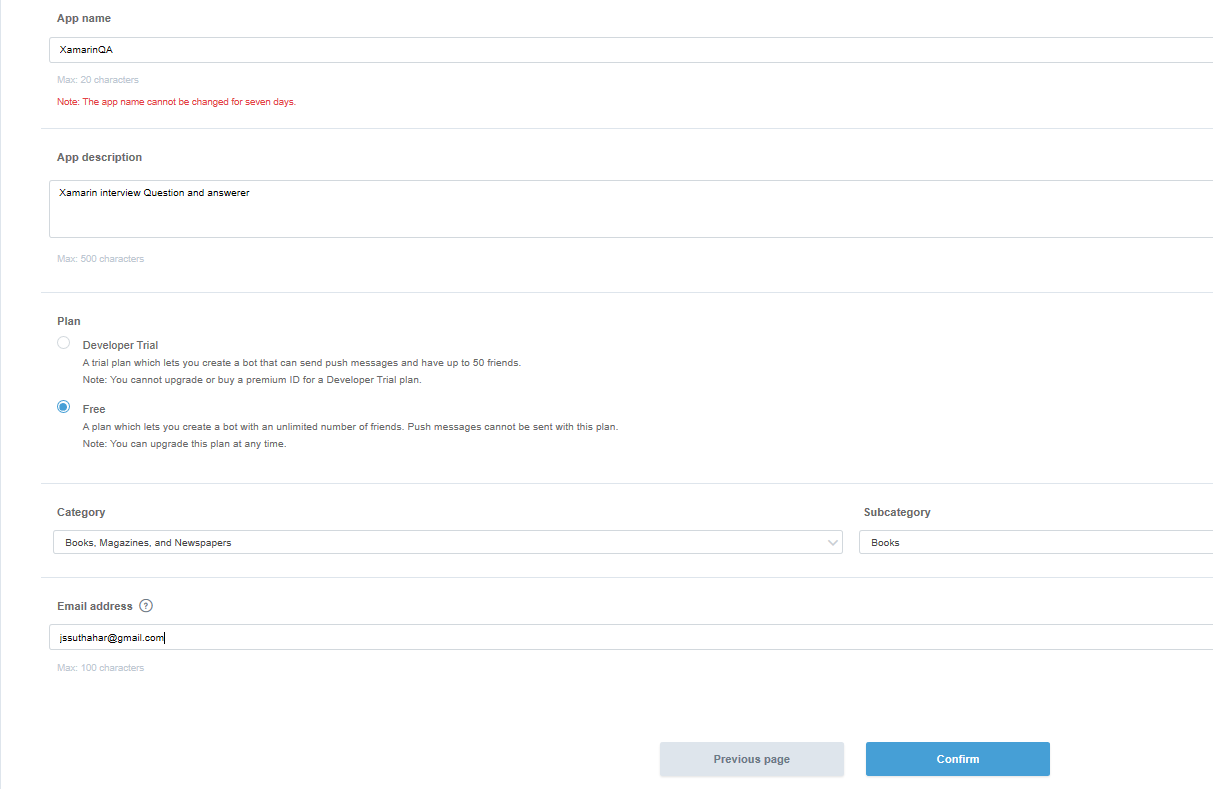
You can Fill out the required fields and confirm your channel settings. You can find the two developer options is available.

Developer trial - A trial plan which lets you create a bot that can send push messages and have up to 50 friends.

Free - A plan which lets you create a bot with an unlimited number of friends. Push message cannot be sent with this plan.


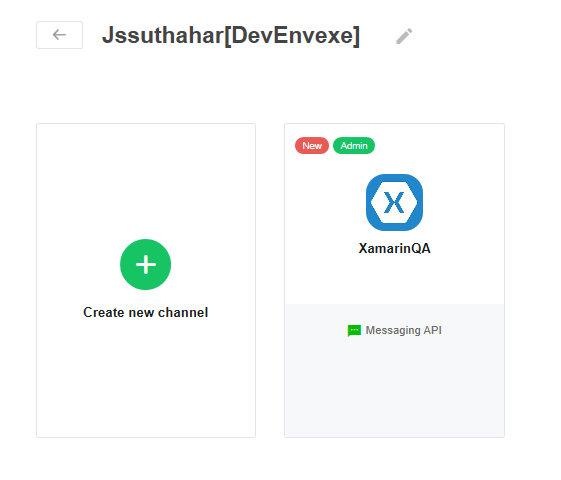
Once you've confirmed your channel settings, you'll be navigating to a following screen, which list all the apps.


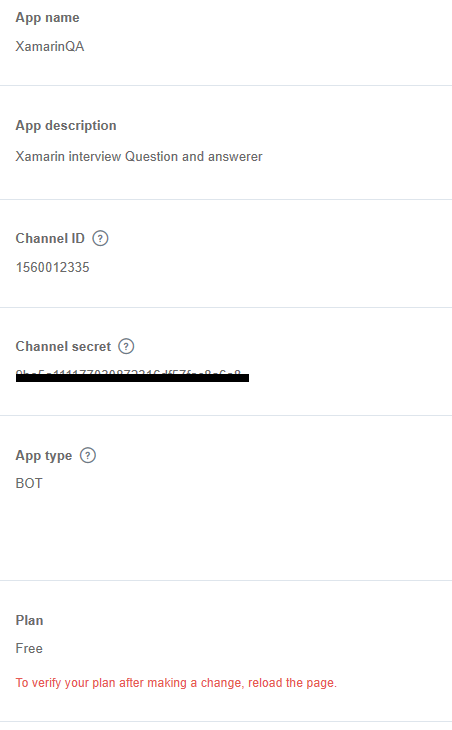
Click on the channel you created to access your channel settings, and scroll down to find the Basic information > Channel secret.

You can Save following somewhere for a moment for update in to Azure portal.

Channel Secret – Copy the secret code, if not available, click on Issue

Channel access Token - Scroll farther to Messaging settings. There, you will see a Channel access token field, with a click on issue button for get your access token.

Webhook URL - Webhook URL copy from Azure Portal and Update in the Line app developer portal


Connect New LINE Channel

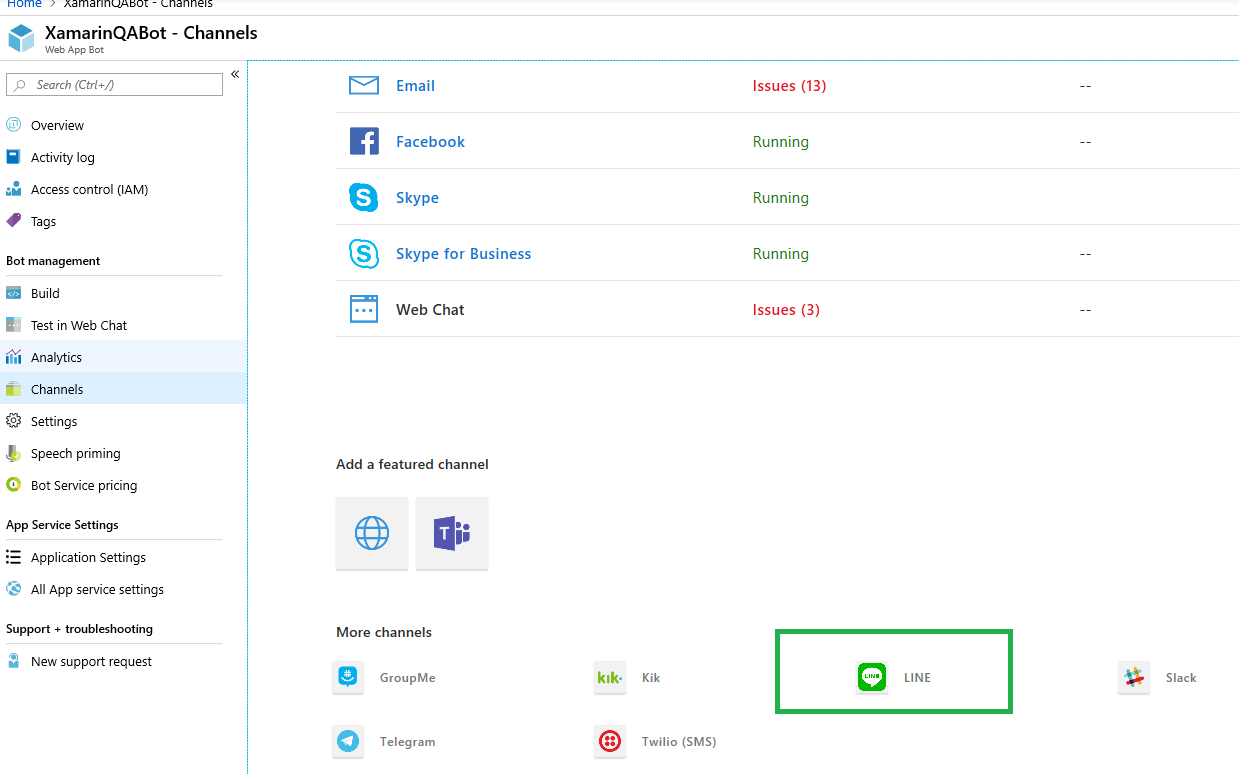
Login to Azure portal > Select the “All Resources” > Select your Bot Application > Select Channels property > Find and Select New Line icon. Let us start to configure the “Line “Channel and follow the below steps, at the end of this article you will be able to deploy the Bot into the Line apps.


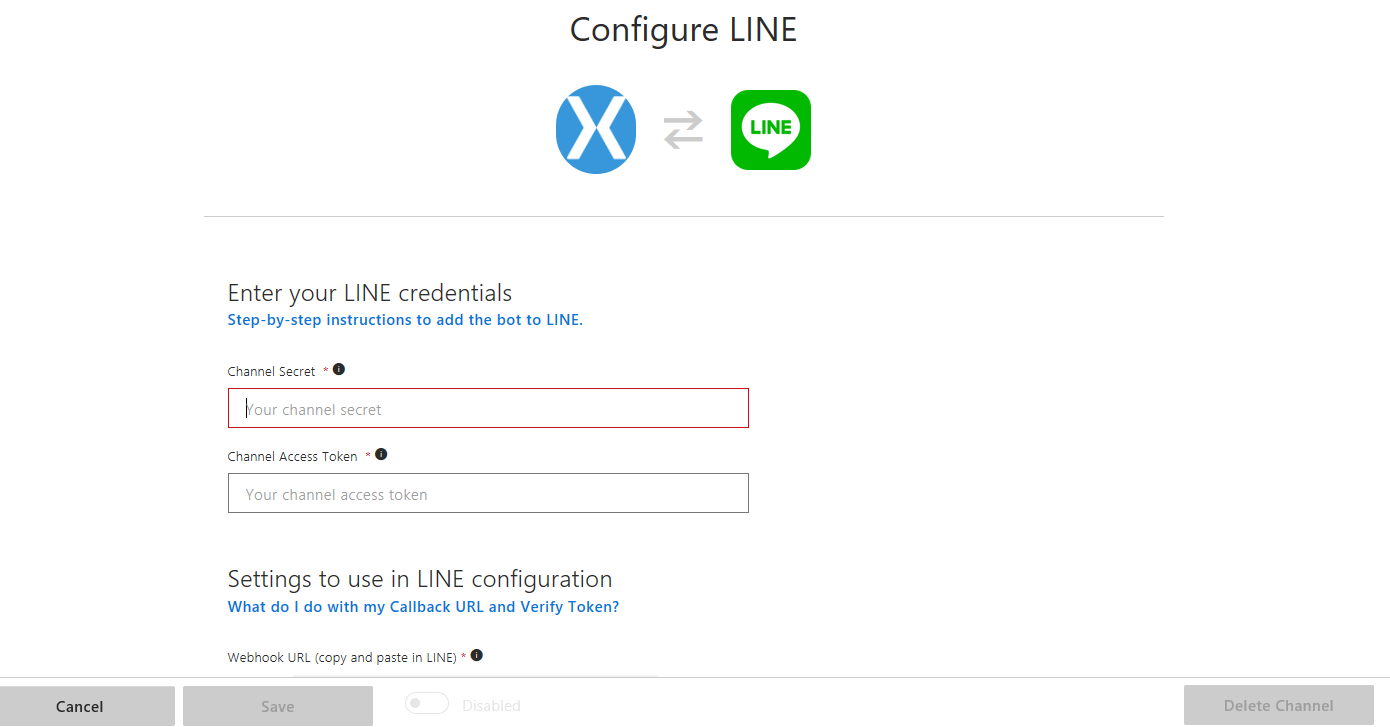
The Azure Line configuration channel will generate the following Webhook URL and past/update the channel secret and access token and click Save button. You can copy following custom webhook URL and Return to the Line Developer portal and update the webhook URL


Test Your Bot

Once you have completed all the above steps, your bot will be successfully configured to communicate with users on LINE and is ready to test.

LINE developer console - Navigate to the settings page and you will see a QR code of your bot.

Mobile LINE app - go to the right most navigation tab with three dots [...] and tap on the QR code icon.


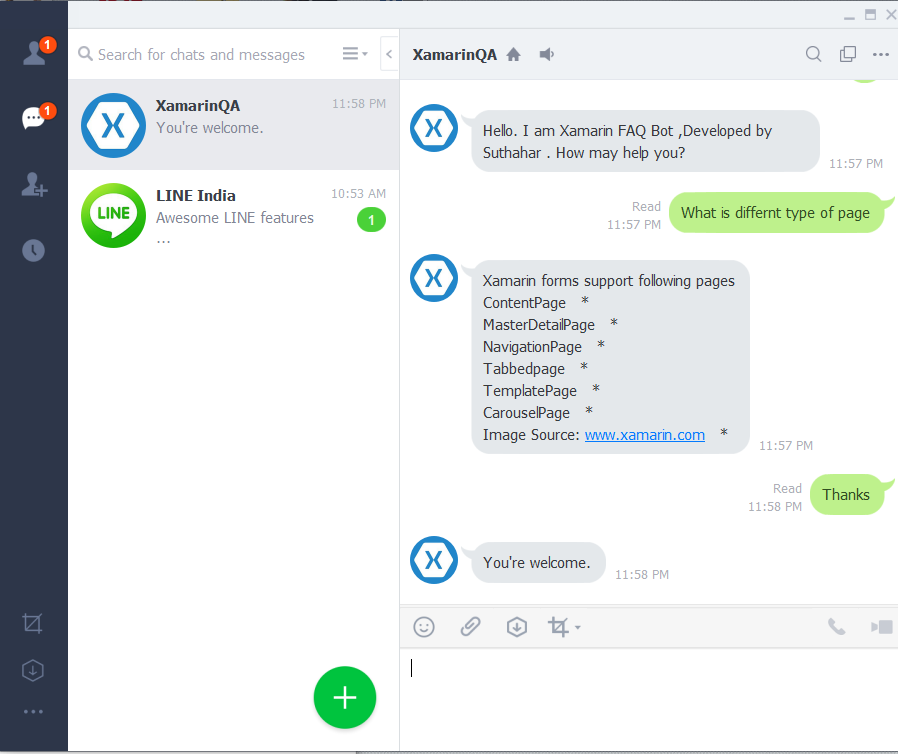
Live Demo


Xamarin Developer Interview questions and answers Bot is ready to use in Line app. Xamarin FAQ Bot will be ready with 7000+ more Xamarin QnA’s. Now you can start open your Line App and > click on three dot line > Scan the following QR Code to add Xamarin QA bot as a friend.


Summary

In this article, you have learned how to integrate a bot application into Line App via Azure Microsoft AI. In case your bot is not responding to any of your messages at all, navigate to your bot in Azure portal, and choose Test in Web Chat. If you have any questions/ feedback/ issues, please write in the comment box.

Tuesday, March 26, 2019

Building Xamarin Mobile Application with Analyzing Customer Feedback using Sentiment Analysis API


Introduction:

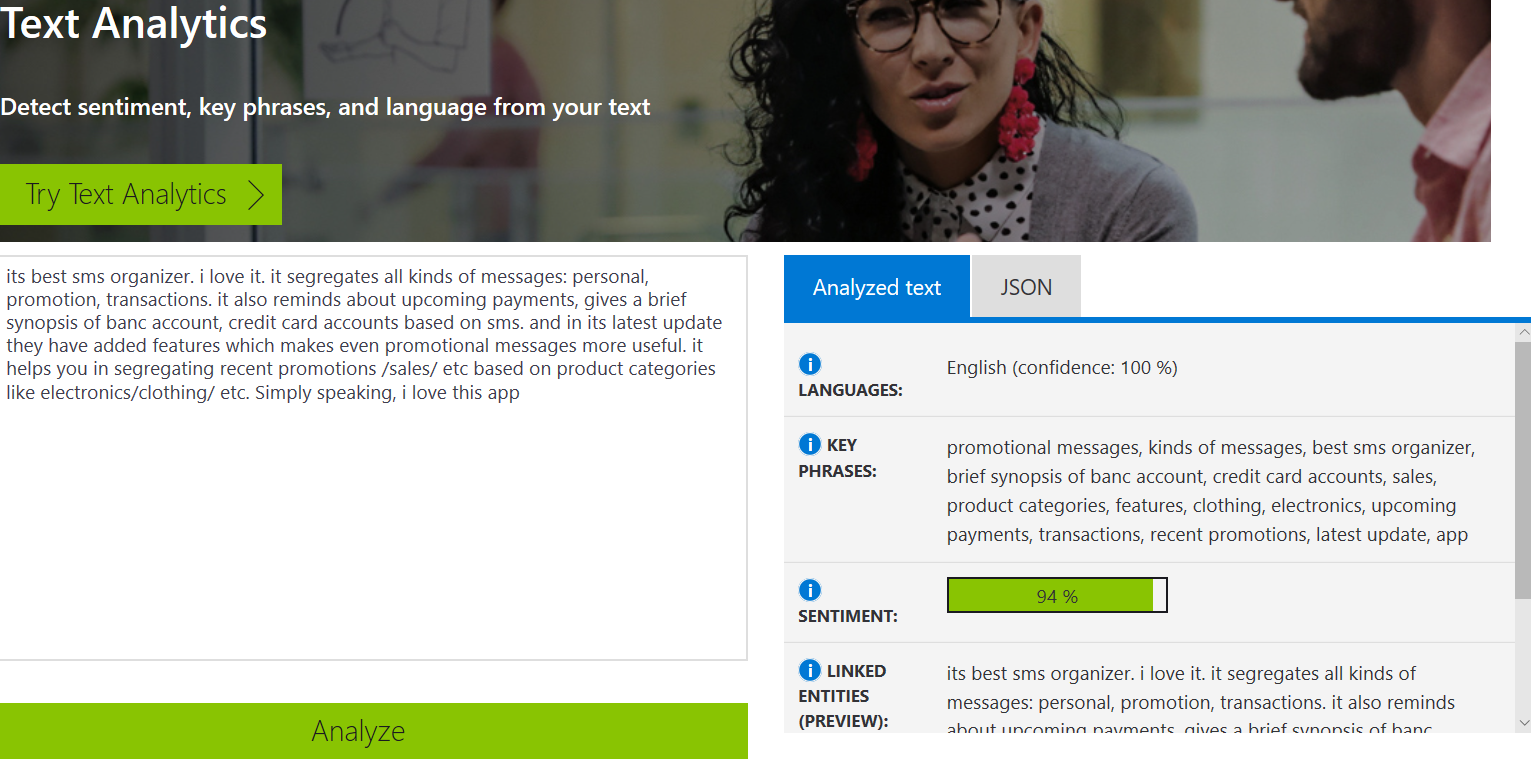
Sentiment analysis seeks to understand a subject’s attitude or emotional reaction towards a specific topic or brand. Sentiment analysis does not have to be complicated and technical. It could be something as simple as getting a person in your team to find what is being said about your brand and product on review page and identify how much of it is good and how much of isn’t. There is no need for a big budget and developer into complicated software, the cognitive service text Analytics API is a cloud-based service that provides advanced natural language processing over raw text, and includes four main functions: sentiment analysis, key phrase extraction, language detection, and entity linking.
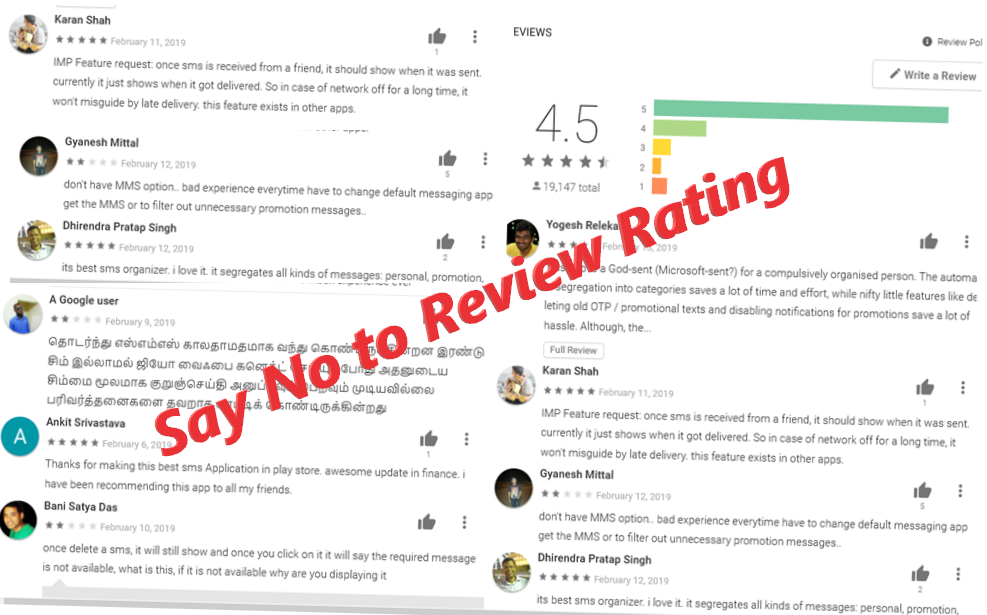
The most of the companies and brands now use sentiment analysis to find out what people are saying about them on social media. A bad review on social media can destroy a brand’s reputation if ignored or poorly handled. They aren’t simply rating their experience with 1 star or 5 stars. They’re also expressing their thoughts, feeling, expectations in free form text. This can be challenging to handle, especially if your company is getting a lot of feedback. When you have tens or even hundreds of thousands of feedbacks to read and manage, its easy to use cognitive text analytics service API.


The Sentiment Analysis API evaluates text input and returns a sentiment score for each document, ranging from 0 (negative) to 1 (positive). This capability is useful for detecting positive and negative sentiment in social media, customer reviews, and discussion forums. Content is provided by you, models and training data are provided by the service.
Currently, Sentiment Analysis supports English, German, Spanish, and French. Other languages are in preview. In this article, I will show how we can integrate sentiment API from Xamarin Mobile application using visual studio 2019
Text Analytics API Price:
The Text Analytics API can be purchased in units of the S0-S4 tier at a fixed price. Each unit of a tier comes with included quantities of API transactions. If the user exceeds the included quantities, overages are charged at the rate specified in the pricing table below. These overages are prorated and the service is billed on a monthly basis. The included quantities in a tier are reset each month. In the S tier, the service is billed for only the amount of Text Records submitted to the service. You can read more about pricing based on country check out here.
Create Text Analytics API Key:
You need to create an Azure account, generate API key and end point URL based region for implementation to the Xamarin Mobile application.
Step 1: Create Free Azure subscription and Login to portal  
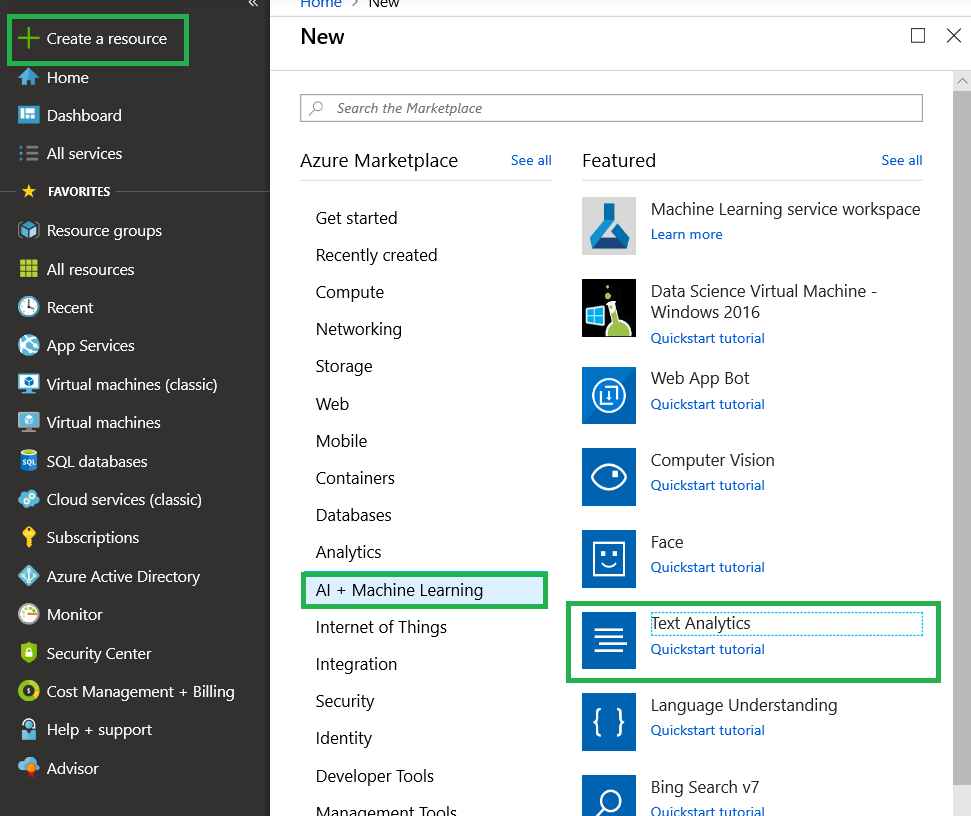
Step 2: Create On “+ Create a resource “> Under Azure Marketplace, select AI + Machine learning and discover the list of available featured. > Select “Text Analytics
Step 3:  On the create page, provide the name, pricing, resource group and click on Create
Step 4:
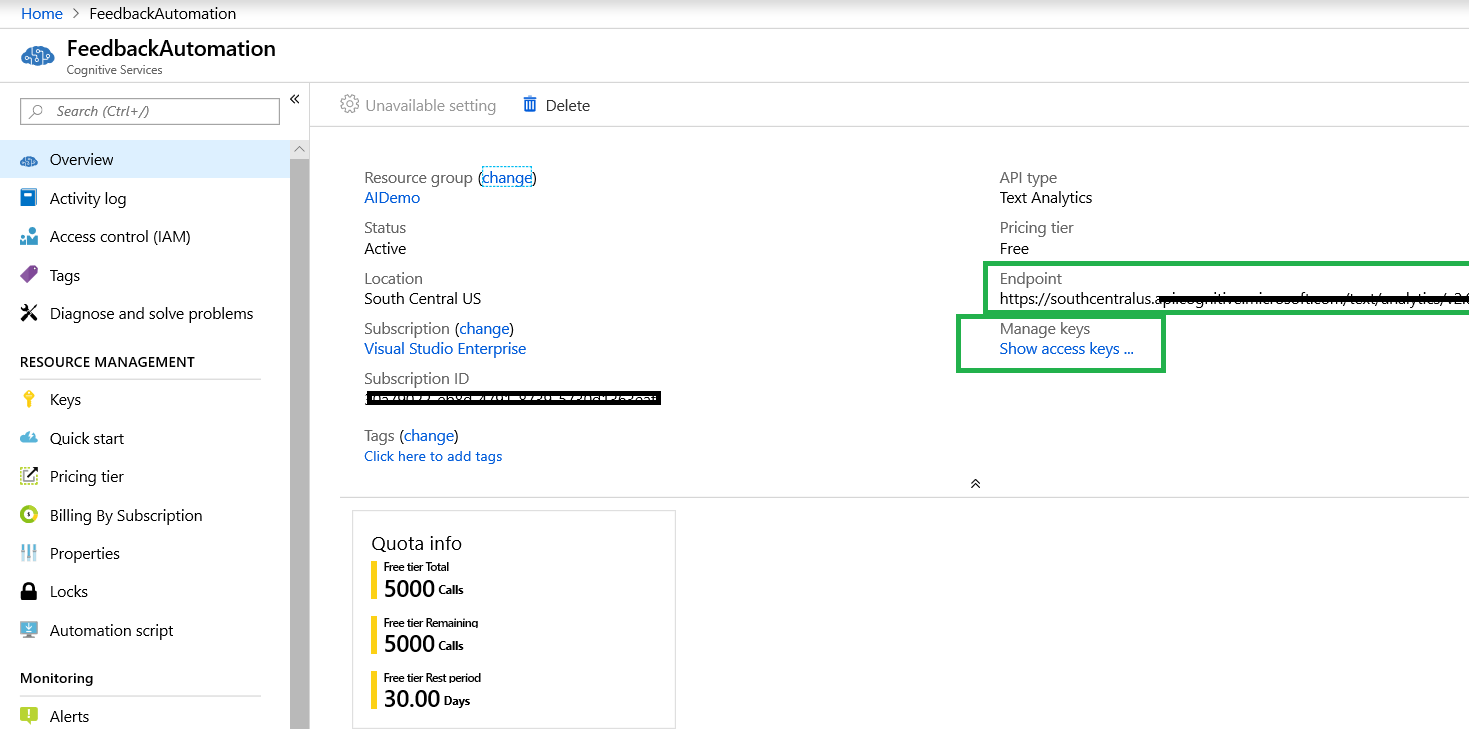
Wait for a few seconds. After the Cognitive Services account is successfully deployed, click the notification or tile in the dashboard to view the account information. You can copy the Endpoint URL and Key in the Overview section for API calls in our Xamarin applications.


Build Xamarin Forms Application using Visual Studio 2019:
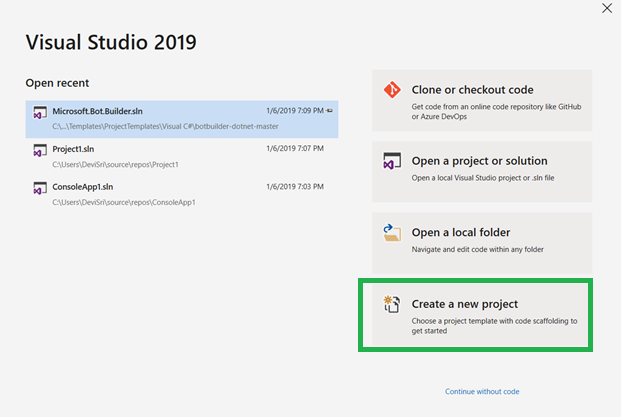
Let's start with creating a new Xamarin Forms Project using Visual Studio 2019. When accessing Visual Studio 2019 for the first time, you will come across a new interface for opening a creating the projects.
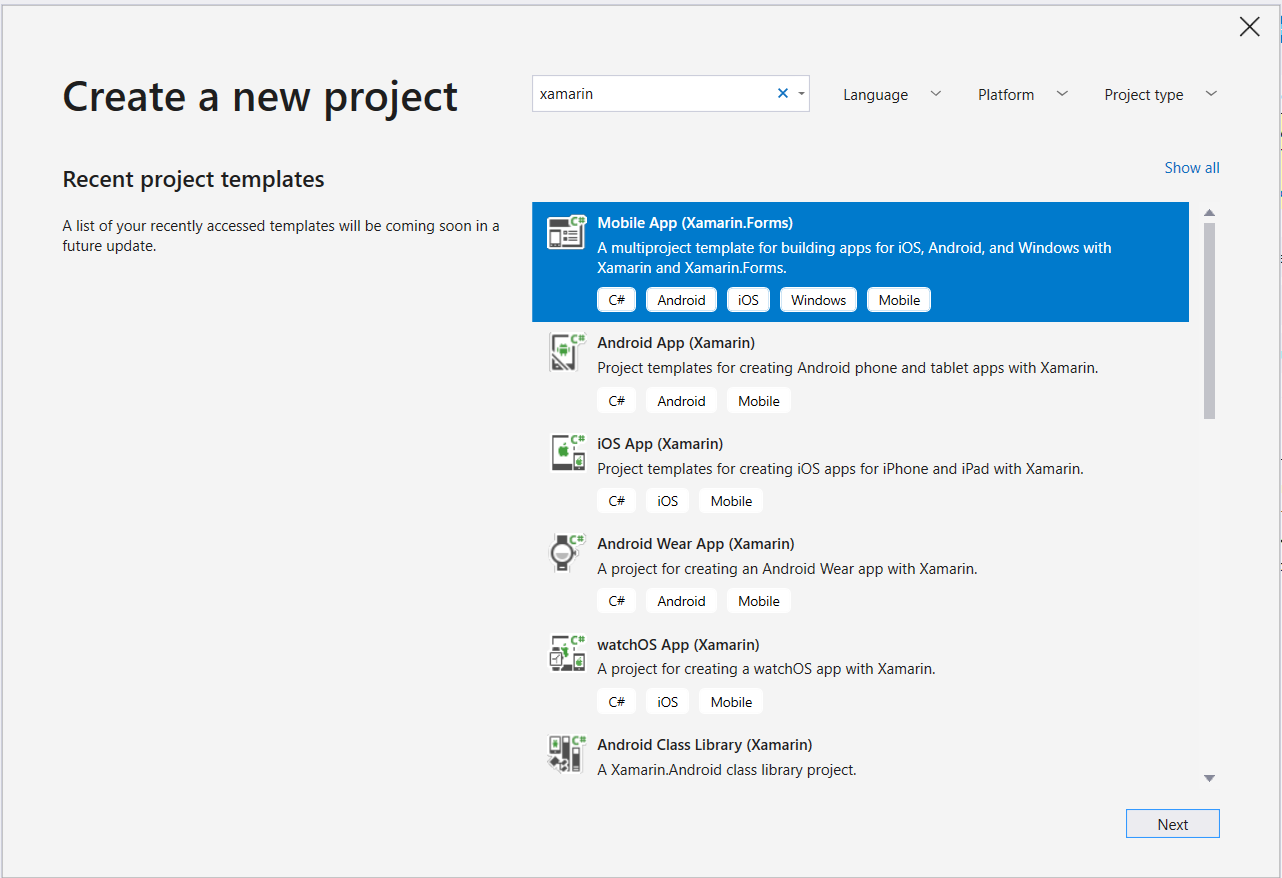
Open Run >> Type “Devenev.Exe” and enter >> Create New Project (Ctrl+Shift+N) or select open recent application.
The available templates will appear on a window like below. Select Xamarin Forms application with different mobile platform.
Provide project name, Location and solution name in the following configure new project screen
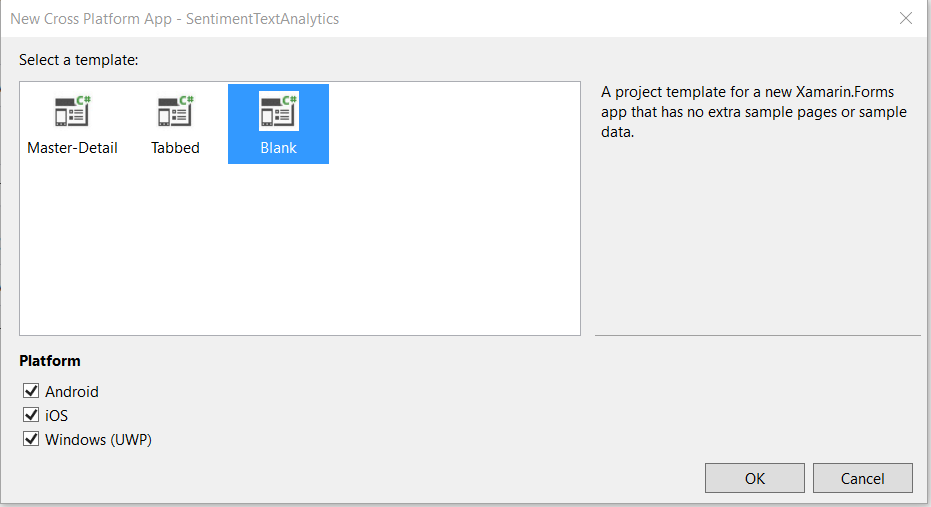
Select as Blank apps and select the platform
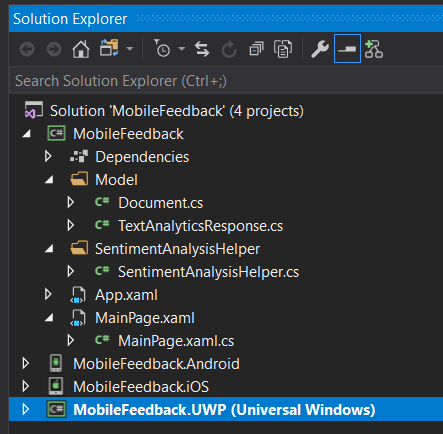
The Solution will be created with all the platform and PCL projects.
PCL UI Design:
The UI will have a few elements on the screen and overlay content view window. Editor control for providing user input value and overlay window for show the result.
You can add Newtonsoft.JSON to solutions. Right click on Solutions > Manage NuGet Packages > select Newtonsoft.Json from Browse tab > click on Install.
<?xml version="1.0" encoding="utf-8" ?>
<ContentPage xmlns="http://xamarin.com/schemas/2014/forms"
            xmlns:x="http://schemas.microsoft.com/winfx/2009/xaml"
            xmlns:local="clr-namespace:MobileFeedback"
            :Class="MobileFeedback.MainPage">

   <ContentPage.Content>

       <AbsoluteLayout>

           <!-- Normal Page Content -->
           <StackLayout AbsoluteLayout.LayoutBounds="0, 0, 1, 1"

                AbsoluteLayout.LayoutFlags="All">
               <Image Source="product.gif"   VerticalOptions="Start" HorizontalOptions="Start"  Margin="0,0,0,0" ></Image>
               <Editor x:Name="txtfeedback" WidthRequest="100"  HeightRequest="200"></Editor>
               <Button Text="Submit" Clicked="Submit_Clicked"></Button>
               
           </StackLayout>

           <!-- Overlay -->

           <ContentView x:Name="overlay"
                AbsoluteLayout.LayoutBounds="0, 0, 1, 1"
                AbsoluteLayout.LayoutFlags="All"
                IsVisible="False"
                BackgroundColor="#C0808080"
                Padding="10, 0">

               <StackLayout Orientation="Vertical"
                  BackgroundColor="White"
                  HeightRequest="175"
                  WidthRequest="300"
                  HorizontalOptions="Center"
                  VerticalOptions="Start"
                  Margin="0,20,0,0" >

                   <Image x:Name="imgstatus" WidthRequest="70" HeightRequest="70"></Image>
                   <Label Text="" x:Name="lblStatus"></Label>

                   <StackLayout Orientation="Horizontal" HorizontalOptions="Center">
                       <Button Text="OK" FontSize="Small"
                       VerticalOptions="CenterAndExpand"
                       HorizontalOptions="Center"
                       Clicked="OnOKButtonClicked" />
                   </StackLayout>
               </StackLayout>
           </ContentView>

       </AbsoluteLayout>

   </ContentPage.Content>

</ContentPage>

Create Document Entity Class:
Create class for Document class, it will deserialize the response and return an object of type TextAnalyticsResponse.The response format defined by the API looks like below document entity
using System;
using System.Collections.Generic;
using System.Text;

namespace MobileFeedback
{
 
    class Document
   {
       public string Id { get; set; }
       public double? Score { get; set; }
   }
   class TextAnalyticsResponse
   {
       public List<Document> Documents { get; set; }
   }

}

Create SentimentAnalysisHelper Helper Class:
You can replace Text Analytics API service endpoint and subscription key. If you don't already have these go back to the previous steps. Below is the complete class you need to add. we have to appended /sentiment to the end of the ApiUri in order to invoke the sentiment operation.
using Newtonsoft.Json;
using System;
using System.Collections.Generic;
using System.Net.Http;
using System.Text;

namespace MobileFeedback
{
   static class SentimentAnalysisHelper
   {
       private const string ApiUri = "<API url>”;
       private const string SubscriptionKey = "<your Key>";
       private const string Text = "The food was delicious and there were wonderful staff.";
       private static readonly HttpClient Client = GetClient();

       private static HttpClient GetClient()
       {
           var client = new HttpClient();
           client.DefaultRequestHeaders.Add("Ocp-Apim-Subscription-Key", SubscriptionKey);
           client.DefaultRequestHeaders.Add("ContentType", "application/json");
           client.DefaultRequestHeaders.Add("Accept", "application/json");
           return client;
       }
       private static TextAnalyticsResponse DeserializeTextAnalyticsResponse(string json)
       {
           return JsonConvert.DeserializeObject<TextAnalyticsResponse>(json);
       }
       public static TextAnalyticsResponse GetSentiment(string text)
       {
           var body = JsonConvert.SerializeObject(new
           {
               Documents = new object[]
                 {
       new
       {
         Text = text,
         Id = Guid.NewGuid()
       }
                 }
           });

           using (var content = new ByteArrayContent(Encoding.UTF8.GetBytes(body)))
           {
               var responseMessage = Client.PostAsync(ApiUri, content).Result;
               responseMessage.EnsureSuccessStatusCode();
               var json = responseMessage.Content.ReadAsStringAsync().Result;
               return DeserializeTextAnalyticsResponse(json);
           }
       }
   }
}

You can add following to code behind in the design file. we'll add a method(GetSentiment) to call the Text Analytics API sentiment endpoint. It will deserialize the response and return an object of type TextAnalyticsResponse .The method will take a string text as input, create the request body, and then send it to the Text Analytics API using an HttpClient instance.
using System;
using System.Collections.Generic;
using System.Linq;
using System.Text;
using System.Threading.Tasks;
using Xamarin.Forms;
using System.Net.Http;
using System.Threading;

namespace MobileFeedback
{
   public partial class MainPage : ContentPage
   {
      
       public MainPage()
       {
           InitializeComponent();
          
       }

       private  void Submit_Clicked(object sender, EventArgs e)
       {
          
           TextAnalyticsResponse result =  SentimentAnalysisHelper.GetSentiment(txtfeedback.Text);
           double? score = result.Documents.FirstOrDefault().Score;
           if(score < 0.5)
           {
               imgstatus.Source = "bad.png";
               lblStatus.Text = "This is the first time we have heard of this problem. Thank you for pointing it out to us. I assure you we will do our best to prevent it from happening again, We will contact with you regardng the issue";
           }
           else if(score > 0.5 && score < 0.9)
           {
               imgstatus.Source = "okay.png";
               lblStatus.Text = "We are always eager to get feedback from our customers. Thank you for taking the time to write to us.We will improve our service and our team will contact you";
           }
           else if(score> 0.9)
               {
               imgstatus.Source = "happy.png";
               lblStatus.Text = "Your valuable feedback will assist us in our continuing effort to provide our users with the best possible support experience.";
           }
           overlay.IsVisible = true;
       }
       void OnOKButtonClicked(object sender, EventArgs args)
       {

           overlay.IsVisible = false;

       }

       void OnCancelButtonClicked(object sender, EventArgs args)
       {
           overlay.IsVisible = false;
       }
   }

}

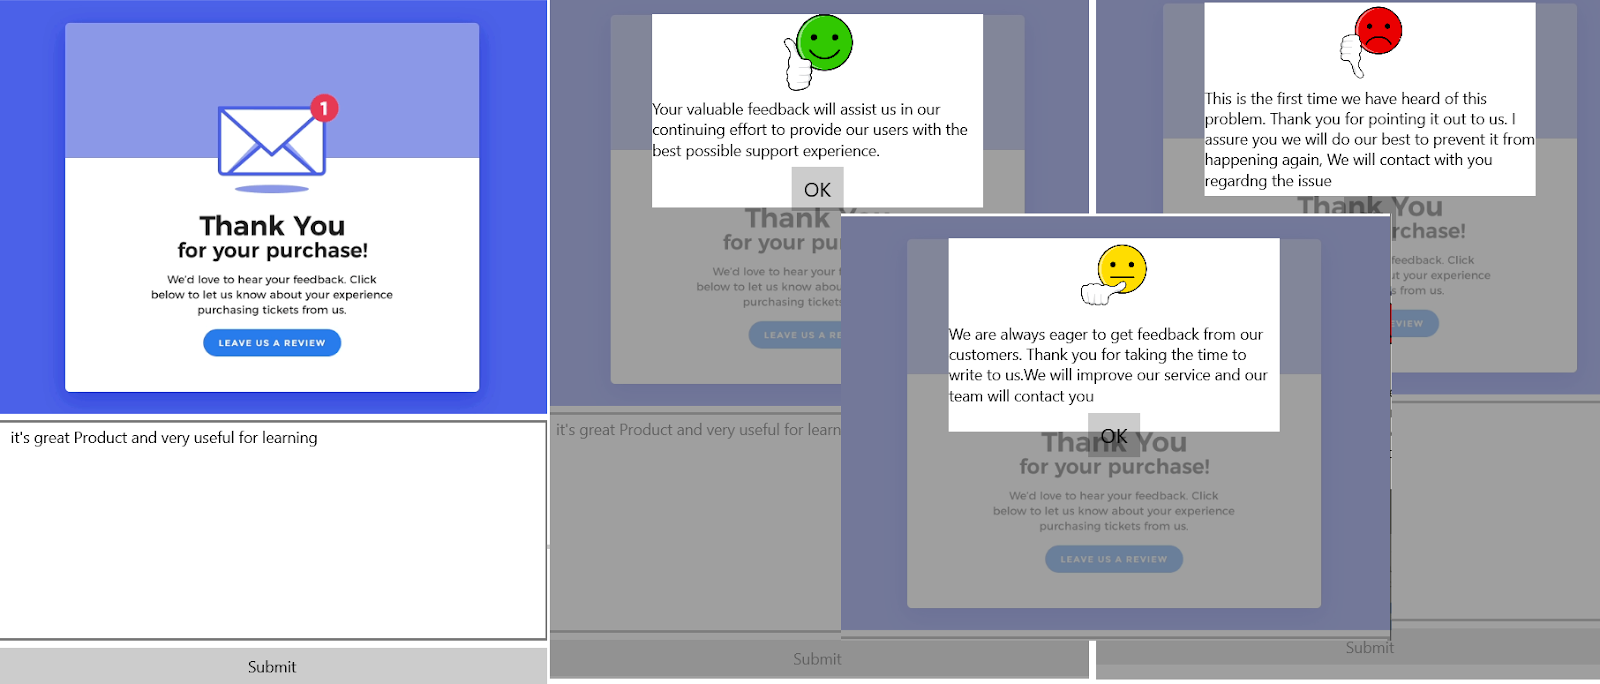
We have completed the code for consuming TextAnalytics API. Now, we can select the platform and press F5. The output looks like below

Summary

In this article, you learned how to consuming TextAnalytics API and automate customer feedback without using rating. I hope this article will help you. Please leave your feedback/query using the comments box, if you like this article, please share it with your friends.